



MyChart Virtual Visit Troubleshooting
Virtual visits give you a convenient alternative to an in-person appointment when you need a quick check-in or follow-up with your provider. Meeting by live video may feel unfamiliar at first, but getting connected is usually quick and straightforward.
Understanding Virtual Visits
When you have a virtual visit scheduled, you’ll sign in to MyChart® using your computer, smartphone or tablet. These visits use Zoom™ to connect you and your provider by live video, so your device will need a camera, microphone and internet connection to make this happen. You can also do virtual visits using the MyChart Mobile and MyCleveland Clinic® (MyCC) apps.
Types of MyChart visits
There are two types of virtual visits available through MyChart. Check your appointment details to confirm which type of visit you’re joining.
- MyChart Virtual Visits (scheduled appointments): Visits scheduled ahead of time with your provider
- Express Care® Online: On-demand virtual visits to speak with a provider right away
Privacy and security
Cleveland Clinic values your privacy and security. MyChart video visits use Zoom for Telehealth, a HIPAA-compliant service integrated with our electronic health records and MyChart. Your video visit will use a secure, encrypted connection that protects your private information.
For security, you must connect through the MyChart website — you can’t join visits directly from the Zoom website. Make sure to use the most up-to-date version of Zoom Cloud Meetings (version 4.6 or higher). If you need help at any time, call MyChart Support at 866.915.3383.
Guides for getting started
When you open your appointment details in MyChart, you’ll see guides to help you get ready for your visit. These include instructions for:
- Completing your virtual visit’s electronic check-in
- Installing Zoom if you don’t already have it
Before Your Scheduled Video Visit
Complete these steps at least one day before your video visit, if possible. For same-day appointments, allow at least 15 minutes before your scheduled time to do this. Once you log in to your MyChart account, follow these steps:
- Find your appointment on the home screen and click PreCheck-In. You must complete this before starting your visit. PreCheck-In can be done up to seven days in advance.
- Verify your information and answer all required questions.
- Complete any pre-visit questionnaires on the Appointment Details screen.
- Share images with your provider (if needed) by completing the Document/Image/Photo ID questionnaire.
- Install Zoom if it’s not already on your device. Click the appropriate installation link for your device. Your video visit will launch directly from MyChart.
- Enable pop-ups for Zoom in your internet browser settings.
Starting Your Scheduled Virtual Visit
Cleveland Clinic offers scheduled video visits through your secure MyChart account. You may connect up to 15 minutes before your scheduled time. It’s important to log in early because you can’t join after 20 minutes past your appointment.
Follow the steps below to start your visit on time once you sign into your MyChart account on a computer or a mobile device.
When you can join your visit
You can join your appointment up to 15 minutes before your scheduled start time. You need to log in to MyChart, but you don’t need to create a Zoom account.
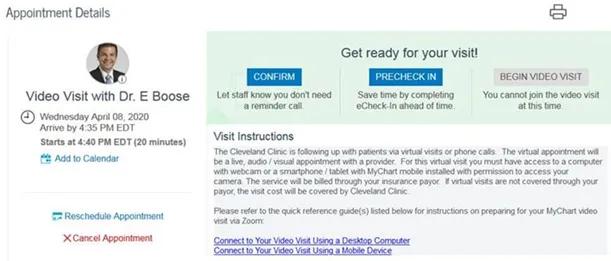
Image content: This image is available to view online.
View image online (https://assets.clevelandclinic.org/transform/aebe2cfe-a788-4e29-84f5-7a159301de21/MyChart-Virtual-Visit-1)
- If you join more than 15 minutes early: The Join Now button will appear grayed out and can’t be selected. You’ll also see a blue notification near the top of the page, letting you know it’s not yet time to start your visit. Stay on the page and wait until the appointment is within the 15-minute window.
- When it’s time to join your visit: The Join Now button will turn green, and you’ll be able to start your visit. If you arrive early and are waiting on the page, click the blue Refresh Page button to update the screen and enable the green Join Now button.
- If you’re running late: You can still join your visit up to 20 minutes after the scheduled appointment time.
- If you join more than 20 minutes late: MyChart will automatically cancel the visit, and you’ll need to reschedule with your provider.
- If you see a “Connection Problem” message: This usually means the 20-minute window has passed while you were completing PreCheck-In. The visit has been canceled, and you’ll need to contact your provider’s office to reschedule.
Joining from a computer
- Sign in to your MyChart® account.
- Find your scheduled appointment on the home screen.
- Click Begin Visit.
- Follow the prompts to launch Zoom and connect with your provider.
- Make sure your camera and microphone are working so your provider can see and hear you.
Joining from the MyChart Mobile or MyCC apps
- Open the MyChart app or MyCC app on your smartphone or tablet and log in to MyChart.
- Tap on your scheduled appointment.
- Tap Begin Visit.
- Follow the prompts to open Zoom and connect with your provider. You don’t need to click the Zoom Sign-In button.
- Check that your camera and microphone are on and working properly.
What To Expect During Your Virtual Visit
Here’s how your video visit will unfold once you log in.
- Waiting for your provider: You’ll see a message letting you know your provider will join soon. Your appointment will launch once your provider connects.
- Joining the video: When prompted, select Join with Video.
- Connecting audio: You’ll be asked to join the audio. Select Computer Audio (or the equivalent choice) on your device.
- During the visit: Your provider will see and hear you, just like an in-person visit. You can ask questions, share images and follow the same flow as a regular appointment.
- Ending your visit: When your appointment is finished, close the Zoom window or tap End Visit in the MyChart app. MyChart will automatically record that your visit has finished.
Inviting guests to take part in your virtual visit
During your video visit, you can invite a loved one to join you and your provider. Here’s how:
- Tap the Participants icon on the menu bar at the bottom of your screen.
- Tap the Invite button in the bottom left corner of the Participants page.
- Tap Send Email to email an invitation or Send Message to text an invitation to your guest. Your guest can join your video visit by clicking the link in the invitation.
What To Know About Express Care Virtual Visits
Express Care Virtual Visits let you connect with a provider on demand through MyChart or the MyClevelandClinic or MyChart Mobile apps if you live in Ohio, Florida or Nevada. If you’re using the service for a child, they must be older than 2.
Here’s when the Express Care virtual visits are available through MyChart:
- Monday–Friday: 7 a.m. – 8 p.m. (ET)
- Saturday–Sunday: 7 a.m. – 7 p.m. (ET)
- Holiday Hours: Refer to clevelandclinic.org
Connecting options
When using MyChart on a web browser, log in and then:
- Select Menu.
- Click on the Express Care Virtual Visits or Express Care Virtual Visits – See a provider now! button in the top right-hand corner.
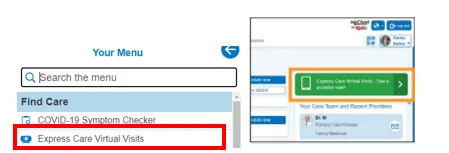
Image content: This image is available to view online.
View image online (https://assets.clevelandclinic.org/transform/08bc9daa-89a9-4e77-b698-ae2c6a877b90/MyChart-Virtual-Visit-2)
For the MyChart Mobile app:
- Select Menu.
- Tap on Express Care Virtual Visits.
- Indicate “Where are you located?” to start your Express Care virtual visit.
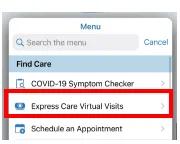
Image content: This image is available to view online.
View image online (https://assets.clevelandclinic.org/transform/027f248b-bc52-4566-944f-405de2882291/MyChart-Virtual-Visit-3)
If you’re using the MyCC Mobile:
- Select Express Care Virtual Visits.
- Indicate “Where are you located?” to start your Express Care virtual visit.
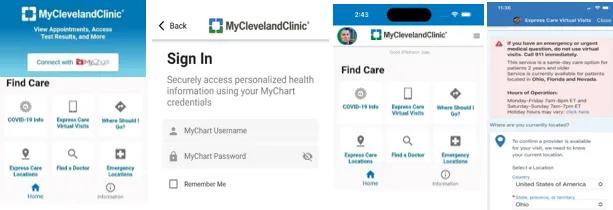
Image content: This image is available to view online.
View image online (https://assets.clevelandclinic.org/transform/76aa7e8b-9255-4be0-9d7e-b4e9d12d9489/MyChart-Virtual-Visit-4)
If you don’t have a MyChart account
If you want to join a virtual visit without a MyChart account, you can use the MyCC app to connect with a provider. Here’s how:
- Log in to the app.
- Tap on Express Care Virtual Visits.
- Select Start a Visit for yourself or Someone else.
You can also access this service from our Virtual Visits page by scrolling down to the New Users section and selecting Use the desktop version.
Before you start your Express Care virtual visit
Once you’re logged in and ready for a provider to see you, you’ll need to share information about why you’re there. You’ll also need to schedule your Express Care virtual visit before beginning the PreCheck-In process. You can find helpful guides in MyChart on the appointment details page:
- Begin Video Visit Instructions
- Patient Mobile User Guide
- Patient Web User Guide
PreCheck-In, Join Visit and Virtual Waiting Room
You’ll need to complete PreCheck-In before launching the video visit. During PreCheck-In, you’ll fill out a MyChart eVisits questionnaire. You may wonder why. While this isn’t directly related to your Express Care virtual visit, your answers can help with scheduling your visit.
Once you complete this, you will be prompted to click Join Now to enter the Zoom virtual visit waiting room. A provider will connect you to the Zoom session when ready. This can take several minutes, depending on how many visits are ahead of yours. Please don’t leave.
If you try to connect outside of hours or in a state where we don’t have licensed providers, you’ll see this message: "Something went wrong… cannot enable virtual visits for your account."
Payment
If you’re using self-pay or have an out-of-network insurance, you’ll be asked to pay a $65 fee by a secure credit card prior to connecting with a provider. You’ll be charged only after the visit ends.
Tips and Troubleshooting for Virtual Visits
Here are some tips for managing common problems you might run into when joining or taking part in virtual visits:
Compatible web browsers for video visits
Google Chrome is the preferred web browser for video visits on a Windows computer, but you can access virtual visits in MyChart using any of these:
| Operating system | Supported browser |
|---|---|
| Android | Google Chrome |
| iOS (Apple) | Safari or Google Chrome |
| macOS computer | Safari or Google Chrome or Firefox |
| Windows computer | Google Chrome or Microsoft Edge or Firefox |
| Linux computer | Google Chrome or Firefox |
| Operating system | |
| Android | |
| Supported browser | |
| Google Chrome | |
| iOS (Apple) | |
| Supported browser | |
| Safari or Google Chrome | |
| macOS computer | |
| Supported browser | |
| Safari or Google Chrome or Firefox | |
| Windows computer | |
| Supported browser | |
| Google Chrome or Microsoft Edge or Firefox | |
| Linux computer | |
| Supported browser | |
| Google Chrome or Firefox |
Video and audio problems
- If the video camera icon is crossed out, start the video by clicking or tapping it, depending on the device you’re using.
- If the video still isn’t working, check your computer or phone settings and make sure camera access is enabled for Zoom.
- If the microphone icon is crossed out at the bottom of the screen, click or tap it to unmute.
- On Android devices, you’ll be prompted to allow microphone access after tapping your visit icon. If you deny it multiple times, open your device settings to enable microphone access.
- If you can’t hear your provider, check your computer’s or mobile device’s volume settings.
Connection problems
- Make sure Zoom is downloaded and installed before your video visit. You don’t need to create a Zoom account to join.
- If you’re using a computer, launch Zoom from your appointment in MyChart.
- Check your internet browser settings to ensure pop-ups are allowed.
- If video quality is poor, try switching from Wi-Fi to mobile data or vice versa. Data charges may apply.
If your video visit disconnects, try these steps to get back to your appointment:
- Return to your appointment details page and click Join Now to re-enter the virtual visit waiting room.
- If the Join Now button is no longer available, the provider has already closed the visit. You’ll need to schedule another Express Care virtual visit.
- On Android devices, if you see this error in the MyClevelandClinic app — “Something went wrong… cannot enable virtual visits for your account” — close the app, update it to the latest version and reopen it.
- If you still can’t join or rejoin your visit, contact your provider’s office for help rescheduling.
Pop-up blockers
Here’s what to do if your web browser blocks the appointment pop-up window:
Google Chrome
To change the default settings in Chrome:
- At the top right of your Chrome browser window, click More and select Setting.
- Click Privacy and security and then Site Settings.
- Choose Pop-ups and redirects.
- Choose the option you want as your default setting.
To change the settings for a specific page only (like MyChart), you can:
- Click on the Pop-up blocked icon in the address bar.
- Choose, “Always allow pop-ups and redirects from [site].”
- Click Done.
Microsoft Edge
To change your default settings in Edge:
- Click Settings and more at the top of your browser and select Settings.
- Click Privacy, search and services.
- Select Site permissions, then All permissions.
- Choose Pop-ups and redirects.
- Turn off the Blocked toggle.
To allow pop-ups for a specific webpage (like MyChart):
- Click Settings and more at the top of your browser and select Settings.
- Click Privacy, search and services.
- Select Site permissions, then All permissions.
- Choose Pop-ups and redirects.
- Under Allowed to send pop-ups and use redirects, select Add Site.
- Type the website URL in the dialog box where you want to allow pop-ups. Be sure to include https://.
- Select Add to include the URL in your allow list.
Safari for Mac
To allow pop-ups for a specific website:
- Open Safari and go to the website where you want to allow pop-ups.
- In the Safari menu, select Preferences.
- Click the Websites tab.
- Select Pop-up Windows from the left menu.
- Find the website in the list and choose Allow from the dropdown menu next to it.
- Close Safari Preferences.
- Please note: In Safari versions 10 and 11, pop-up settings are found under Security and then by clicking on Web Content.
Safari (iOS)
To enable and disable pop-up blockers:
- Open the Settings app.
- Tap on Safari.
- Under General, toggle Block Pop-ups on or off. A green toggle means you’ve enabled the pop-up blocker.